Configure, Run & Deploy
This document describes how to configure and run the UtilMeta service and how to deploy it in a production environment.
Service initialization
from utilmeta import UtilMeta

service = UtilMeta(__name__, ...)
The first parameter of the UtilMeta service receives the name of the current module ( __name__). Other supported parameters are
backend: pass in the module or name of the runtime framework, such asbackend='flask'name: name of the service, should reflect the features, will be used in service discovery and registeration.description: description of the service-
production: whether it is in production stage. It is False by default and should be set to True in the deployed production environment. this parameter will affect the running configuration of the underlying framework, such asdjango'sPRODUCTIONsetting. or thedebugparameter in flask/starlette/fastapi/sanic -
host: the host IP that the service listens to. The default is127.0.0.1. It can also be set to the IP of the server or0.0.0.0(to provide public access). -
port: the port number that the service listens to. The default depends on the runtime framework. For example, flask uses5000, other frameworks generally use8000. -
version: specifies the current version of the service. You can pass in a string such as'1.0.2', or a tuple like(0, 1, 0), the version naming is recommeded to follows the semantic version specs) asynchronous: whether the service provides an asynchronous APIs. The default is determined by the runtime framework.api: pass in UtilMeta’s root API class or its reference stringroute: pass in the path string of the root API. The default is'/', which will mount to the root path.auto_reload: set toTrueto enable service auto reload when the code changed during debug, default is None.
When you initialize UtilMeta, you can also import the UtilMeta service instance of the current process in this way
from utilmeta import service
Warning
You can only initialize one UtilMeta service instance in one process
Choose backend
The runtime frameworks currently supported by UtilMeta are
djangoflaskstarlettefastapisanictornado
Tip
If you want more frameworks to be supported, you can bring it to the issues of UtilMeta framework
The framework you specify in backend parameter needs to be installed in your Python environment first, and then you can import the package and pass in a way similar to the following
import django
from utilmeta import UtilMeta

service = UtilMeta(
    __name__,
    name='demo',
    backend=django
)
import flask
from utilmeta import UtilMeta

service = UtilMeta(
    __name__,
    name='demo',
    backend=flask
)
import starlette
from utilmeta import UtilMeta

service = UtilMeta(
    __name__,
    name='demo',
    backend=starlette
)
import sanic
from utilmeta import UtilMeta

service = UtilMeta(
    __name__,
    name='demo',
    backend=sanic
)
Inject custom application
Some runtime frameworks often provide developers with an application class at the same name, such as Flask, FastAPI, Sanic, which can define some initialization parameters, if you need to configure the parameters. You can pass the application instance to the backend param, such as
from fastapi import FastAPI

fastapi_app = FastAPI(debug=False)

service = UtilMeta(
    __name__,
    name='demo',
    backend=fastapi_app,
)
Tip
You can use this method to integrate native APIs of your runtime framework, detailed usage can be found in migration from current project
Asynchronous service
Different runtime frameworks support asynchronous to varying degrees. If asynchronous parameter is not explicitly specified, whether a service API is asynchronous depends on its characteristics, such as
- Django: Both WSGI and ASGI are supported, but
asynchronousis False by default.
Tip
For the service using django as backend, turning asynchronous=True will give you an ASGI application, otherwise you will get a WSGI application
- Flask: WSGI is supported. processing asynchronous functions requires to convert them into synchronous functions. so
asynchronousis default to False - Sanic: ASGI is supported,
asynchronousis True by default - Tornado: Self-implemented HTTP Server based on
asyncio, soasynchronousis True by default - Starlette/FastAPI: ASGI is supported,
asynchronousis True by default
If you want to write async def APIs, choose a runtime framework that supports async by default to maximize the performance of your asynchronous service. If you choose a runtime framework that does not enable async by default (such as django/ flask), You need to turn on the asynchronous=True option or you will not be able to execute the asynchronous functions in it
Service Methods & Hooks
The UtilMeta service instance also has some methods or hooks that can be used.
use(config) Inject configuration
The use method of the service instance can be used to inject the configuration, for example
from utilmeta import UtilMeta
from config.env import env

def configure(service: UtilMeta):
    from utilmeta.core.server.backends.django import DjangoSettings
    from utilmeta.core.orm import DatabaseConnections, Database
    from utilmeta.conf.time import Time

    service.use(DjangoSettings(
        apps_package='domain',
        secret_key=env.DJANGO_SECRET_KEY
    ))
    service.use(DatabaseConnections({
        'default': Database(
            name='db',
            engine='sqlite3',
        )
    }))
    service.use(Time(
        time_zone='UTC',
        use_tz=True,
        datetime_format="%Y-%m-%dT%H:%M:%S.%fZ"
    ))
Common built-in configurations of UtilMeta are
utilmeta.core.server.backends.django.DjangoSettings: Configure the Django settings. Use this if your service uses Django as the runtime framework, or if you need to use the Django models.utilmeta.core.orm.DatabaseConnections: Configure database connectionsutilmeta.core.cache.CacheConnections: Configure cache connectionsutilmeta.conf.time.Time: Configures the time zone of the service and the time format in the APIs.
Warning
A class of configration can only be use once
setup() install configuration
Some service configuration items need to be installed and prepared before the service starts. For example, for services using Django models, setup() functions will calls django.setup to complete the discovery of the models. You need to call this method before import the Django models and the APIs and Schemas that depend on them, such as
from utilmeta import UtilMeta
from config.conf import configure
import django

service = UtilMeta(__name__, name='demo', backend=django)
configure(service)

service.setup()

from user.models import *
Otherwise, an error similar to the following occurs
django.core.exceptions.ImproperlyConfigured:
Requested setting INSTALLED_APPS, but settings are not configured, ...
For projects using Django, a best practice to use a reference string to specify the root API, so that you don’t need to include an import of the Django model in the service configuration file, for example
from utilmeta import UtilMeta
import django

service = UtilMeta(
    __name__,
    name='demo',
    backend=django,
    api='service.api.RootAPI',
    route='/api',
)
from utilmeta.core import api

class RootAPI(api.API):
    @api.get
    def hello(self):
        return 'world'
application() Get WSGI/ASGI Application
You can call the service's application() method to get the generated WSGI/ASGI application, as in the Hello World example.
from utilmeta import UtilMeta
from utilmeta.core import api
import django

class RootAPI(api.API):
    @api.get
    def hello(self):
        return 'world'

service = UtilMeta(
    __name__,
    name='demo',
    backend=django,
    api=RootAPI,
    route='/api'
)

app = service.application()

if __name__ == '__main__':
    service.run()
The type of this generated app depends on the backend framework, such as
flask: Returns a Flask instancestarlette: Returns a Starlette instancefastapi: Returns a FastAPI instancesanic: Returns a Sanic instancedjango: Returns a WSGIHandler by default, or an ASGIHandler ifasynchronous=Trueis specifiedtornado: Returns antornado.web.Applicationinstance
If you use WSGI servers such as uwsgi or gunicorn to deploy API services, you need to specify a WSGI application, and you only need to set the corresponding configuration item to the reference of app , such as
wsgi_app = 'server:app'
[uwsgi]
module = server.app
use sanic
When you are using sanic as runtime backend, even if you does not using any WSGI server, you should declare the app = service.application() in the entry file, because sanic will start new processes to handle requestsm without the loading of APIs in the application() method, the new process won't be able to detect any routes
@on_startup startup hook
You can use the @on_startup decorator of service instance to define a startup hook function, which is called before the service process starts. It can be used to initialize some services, such as
from utilmeta import UtilMeta
import starlette

service = UtilMeta(
    __name__,
    name='demo',
    backend=starlette,
)

@service.on_startup
async def on_start():
    import asyncio
    print('prepare')
    await asyncio.sleep(0.5)
    print('done')
For backend frameworks that support async, like Starlette/FastAPI/Sanic/Tornado, you can use async functions as startup hook functions, otherwise you need to use synchronous functions, like Django/Flask
@on_shutdown termination hook
You can use @on_shutdown decorator of service instance to define a termination hook function, which is called before the service process ends, and can be used to clean up the service process, such as
from utilmeta import UtilMeta
import starlette

service = UtilMeta(
    __name__,
    name='demo',
    backend=starlette,
)

@service.on_shutdown
def clean_up():
    # clean up
    print('done!')
Environment variables
In actual backend development, you often need to use a lot of keys, such as database passwords, third-party secret keys, JWT keys, etc. If these information is hard-coded into the code, there is a risk of leakage, which is very unsafe, and these key information often has different configurations in the development, testing and production environments, so it is more suitable to use environment variables to manage.
UtilMeta provides a built-in environment variable manager component utilmeta.conf.Env for you to manage these variables and key information in the following way
from utilmeta.conf import Env

class ServiceEnvironment(Env):
    PRODUCTION: bool = False
    DJANGO_SECRET_KEY: str = ''
    COOKIE_AGE: int = 7 * 24 * 3600

    # cache -----
    REDIS_DB: int = 0
    REDIS_PORT: int = 6379
    REDIS_PASSWORD: str

    # databases ---------
    DB_HOST: str = ''
    DB_USER: str
    DB_PASSWORD: str
    DB_PORT: int = 5432

env = ServiceEnvironment(sys_env='DEMO_')
By inheriting utilmeta.conf.Env class, you can declare the environment variables required by the service. Environment variables will be parsed case-insensitively, but we recommend using uppercase to distinguish them from other properties. You can declare a type and default value for each variable, and Env will convert the variable to your declared type, and use the default value you specified when the corresponding variable is not provided
Env subclasses can specify the source of environment variables when they are initialized, such as
sys_env: System environment variables
You can specify a prefix that will collect all prefix + name variables in the system environment variables. For example, if the prefix specified in the example is 'DEMO_', the DEMO_DB_PASSWORD variable in the system environment will be parsed as DB_PASSWORD attribute of the env data
If you do not need to specify any prefixes, you can use the sys_env=True
file: Configuration file
In addition to collect from system environment variables, you can also specify a JSON or INI format configuration file using the file parameter
from utilmeta.conf import Env

class ServiceEnvironment(Env):
    pass

env = ServiceEnvironment(file='/path/to/config.json')
and declare the corresponding variables in the file, like
{
    "DB_USER": "my_user",
    "DB_PASSWORD": "my_password"
}
DB_USER=my_user
DB_PASSWORD=my_password
Warning
If you are using the configuration file, please place the config file outside the project directory, or use .gitignore to exclude it from versioning control.
Common Configurations
DjangoSettings
UtilMeta provides a DjangoSettings configuration that provides declarative Django configuration for all projects that use Django as a backend or use Django ORM. common parameters for DjangoSettings are
secret_key: Specifies the secret key for Django. It is recommended to generate a long random key in the environment variable.apps: for specifying DjangoINSTALLED_APPS.-
apps_package: If your django apps are defined under some folder, such as:/project /config /domain /app1 /migrations models.py /app2 /migrations models.pyYou can specify
apps_package='domain'to easily recognize all apps under the/domainfolder, current approach is to detect all subfolders withmigrationsfolder.If the are multiple packages that contains apps, you can pass in a list like
apps_package=['domain.apps', 'vendors'] -
middleware: You can pass in a list of Django middleware here. module_name: Specifies the configuration file reference for Django.extra: You can pass in a dict to specify additional Django configuration.
Also, if you don’t specify module_name for DjangoSettings, it will default to use the module where the UtilMeta service is located as the configuration, so you can also declare the Django configuration in this file directly from the service before setup(). The usage is the same as the native Django configuration, for example
from utilmeta import UtilMeta
from config.conf import configure
import django

DATA_UPLOAD_MAX_NUMBER_FILES = 1000

service = UtilMeta(__name__, name='demo', backend=django)
configure(service)

service.setup()
Warning
service.setup() will trigger django.setup() and load all the Django settings, so you should configure the Django settings before setup
DatabaseConnections
In UtilMeta, DatabaseConnections is used to configure the database connections. It accepts a dict parameter. The key of the dict is the name of the connection. The value is an Database instance used to configure the address and connection information of the database. In the ORM of UtilMeta, if it is not explicitly specified, The database connection with name 'default' is used by default
from utilmeta.core.orm import DatabaseConnections, Database
from config.env import env

service.use(DatabaseConnections({
    'default': Database(
        name='blog',
        engine='postgresql',
        host=env.DB_HOST,
        user=env.DB_USER,
        password=env.DB_PASSWORD,
        port=env.DB_PORT,
    )
}))
Note
If you used Django, you should be familiar with this kind of configuration, DatabaseConnections will generate the DATABASES settings when using Django ORM.
You can see the detailed usage in ORM Configuration Database Connection
CacheConnections
CacheConnections is used to configure cache connections. Similar to DatabaseConnections syntax. The connection dictionary value specifies a cache instance in which the cache’s address and connection information can be configured. For example:
from utilmeta.core.cache import CacheConnections, Cache
from utilmeta.core.cache.backends.redis import RedisCache
from config.env import env

service.use(CacheConnections({
    'default': RedisCache(
        port=env.REDIS_PORT,
        db=env.REDIS_DB,
        password=env.REDIS_PASSWORD
    ),
    'fallback': Cache(engine='django.core.cache.backends.locmem.LocMemCache')
}))
UtilMeta currently supports two cache configurations
- DjangoCache: The default cache configuration will be implemented using Django’s cache, where
engineparameters can be passed into Django’s cache class. - RedisCache: Redis cache configuration supports both synchronous and asynchronous usage. Synchronous usage is implemented by Django, and asynchronous usage is implemented by
aioredis
Time
Time is used to configure time and time zone settings for the project, affecting time serialization in the API and time storage in the database
from utilmeta.conf import Time

service.use(Time(
    time_zone='UTC',
    use_tz=True,
    datetime_format="%Y-%m-%dT%H:%M:%SZ"
))
The parameters include:
time_zone: Specify the time zone of the time. The default is the local time zone. You can use'UTC'to specify the UTC time zone.use_tz: Whether to enable timezone aware for all datetime times in the project. True by default, Django’sUSE_TZconfiguration will be synchronized.date_format: Specify thedateserialization format of the type. The default is%Y-%m-%dtime_format: Specify thetimeserialization format of the type. The default is%H:%M:%Sdatetime_format: Specify thedatetimeserialization format of the type. The default is%Y-%m-%d %H:%M:%S
Preference
You can use Preference to configure the parameters in the UtilMeta framework’s features, like:
from utilmeta.conf import Preference

service.use(Preference(
    client_default_request_backend=httpx,
    default_aborted_response_status=500,
    orm_raise_non_exists_required_field=True
))
Commonly used parameters are:
strict_root_route: Whether to strictly verify the root API route. The default is False. For example, when the root route of the API is/api, Both/api/userand/userwill access to the/userof the root API function. You can set it to True so that only/api/userpath that start with the root route are processed, and all other paths return a 404 responseapi_default_strict_response: Whether the API function enables strict result verification for the generated response. The default is None. If it is set to True, the response generated by the API function will verify the type and structure of the response data by default. If the verification fails, an error will be thrown directly.client_default_request_backend: Specify the defaultClientunderlying request library of the class. Currently, UtilMeta supportshttpx,aiohttp,requestsandurllib, and the default isurllibdefault_aborted_response_status: The response code generated by default if the client request fails and no response can be obtained. The default is 503.default_timeout_response_status: The response code generated by default if the client request times out. The default is 504.orm_default_query_distinct: Whether theorm.Queryquery performedDISTINCTby default. It is not enabled by default, only by specifying__distinct__ = Truein theorm.Queryclass.orm_default_gather_async_fields: In the asynchronous query methods oform.Schema, whether to useasyncio.gatherto aggregate the query of unrelated relational fields. The default is False.orm_raise_non_exists_required_field: Whether to raise error iform.Schemadetect a required field that does not exists on the model. The default is False, a warning prompt will be given.orm_schema_query_max_depth: Specify the maximum query depth fororm.Schemarelational queries. The default is 100. Although relational queries have a mechanism to automatically detect and avoid infinite loop nesting, this parameter can also be used as a bottom-up strategy to deal with other possible situations to enhance the robustness of relational queries.dependencies_auto_install_disabled: Whether to Disable automatically install uninstalled dependencies required to run services or execute commands. The default is False. Uninstalled dependencies detected by UtilMeta are automatically bypip install. However, if your environment may cause the installation to fail and retry many times, you can consider turning on this parameter to disable the automatic installation, so as to avoid relying on the installation to take up a lot of process resources.
Run the service
The UtilMeta service instance provides a run() method to run the service, and we’ve already seen its use.
from utilmeta import UtilMeta
from utilmeta.core import api
import django

class RootAPI(api.API):
    @api.get
    def hello(self):
        return 'world'

service = UtilMeta(
    __name__,
    name='demo',
    backend=django,
    api=RootAPI,
    route='/api'
)

app = service.application()

if __name__ == '__main__':
    service.run()
We usually call service.run() in __name__ == '__main__' block, so you can run the service by executing this file in python, for example
python server.py
The run() method will execute the corresponding operations according to the backend service instance, such as
- Django: Runs the service by invoking a
runservercommand. Not recommended for production environments. - Flask: Directly call the
run()method of the Flask application to run the service - Starlette/FastAPI: Will use
uvicornto run the service. - Sanic: Directly call the
run()method of Sanic applicationto run the service - Tornado: Use
asyncio.runto run the service
Customize running
For Flask, Sanic and other frameworks, you can use service.application() to get the generated Flask / Sanic / other application, so you can also directly call their run() methods to pass in the parameters supported by the corresponding framework.
from utilmeta import UtilMeta
from utilmeta.core import api
import flask

class RootAPI(api.API):
    @api.get
    def hello(self):
        return 'world'

service = UtilMeta(
    __name__,
    name='demo',
    backend=flask,
    api=RootAPI,
    route='/api'
)

app = service.application()

if __name__ == '__main__':
    app.run(
        debug=False,
        port=8000
    )
Deploy the service
We can quickly run an accessible service instance by run() method during debugging, but in actual deployment, we often need additional configuration to make the service run stably at the address we expect and fully unleash the performance of the running environment.
A common deployment architecture for API services developed in Python is
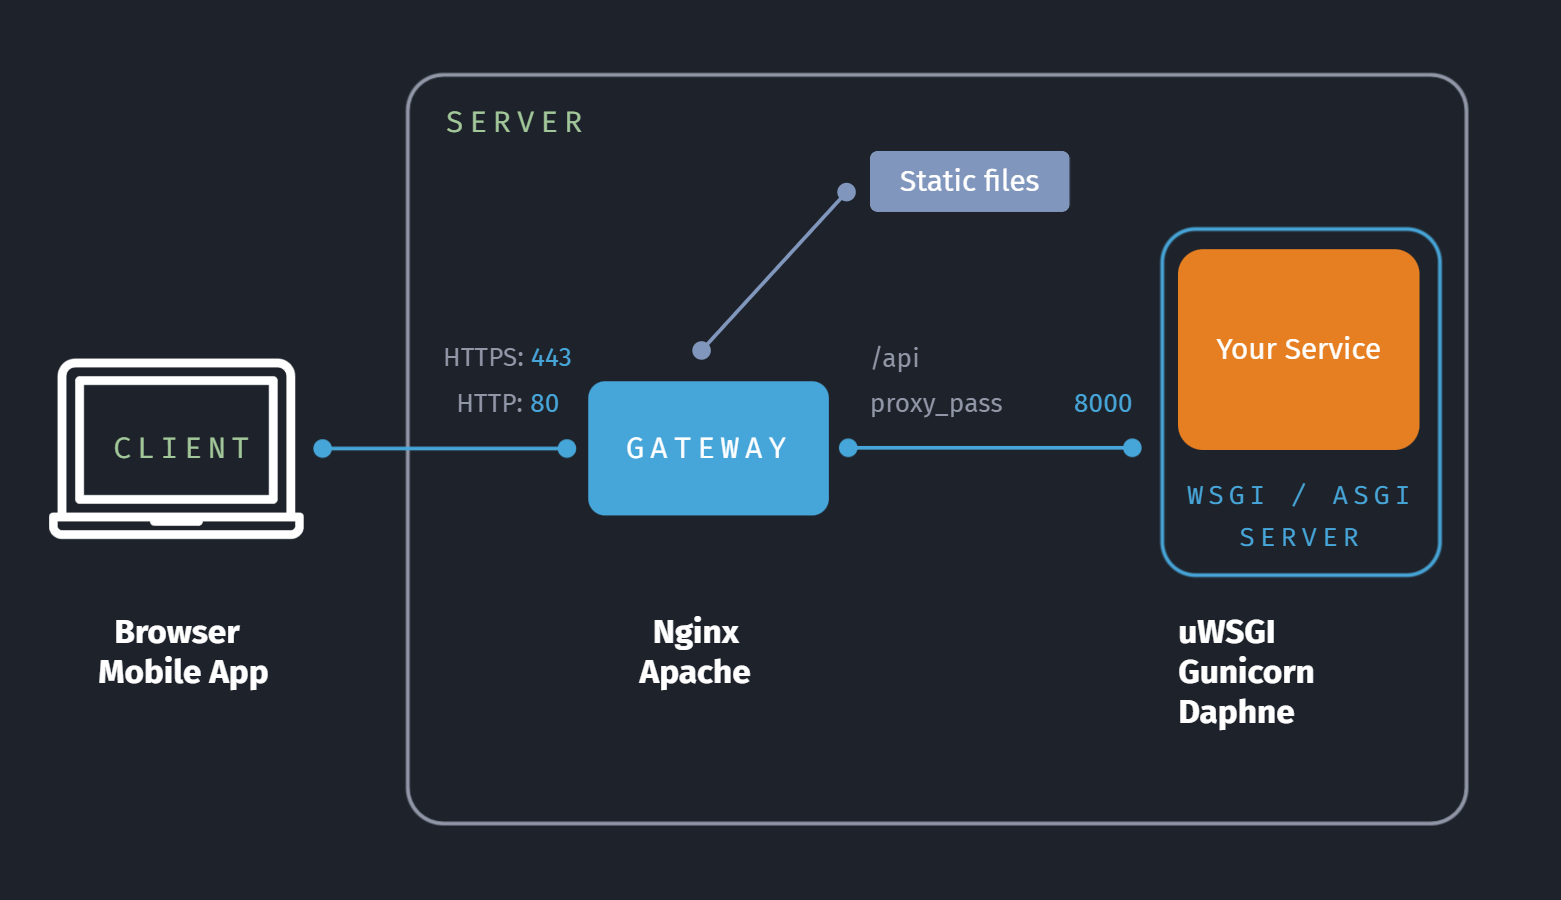
Run your API service on a WSGI server such as uwsgi/gunicorn or an ASGI server such as Daphne for more efficient multi-worker management and request distribution
Then use a reverse proxy service (such as Nginx) to resolve the root route of the API to the port provided by the WSGI/ASGI server. At the same time, it can proxy static files such as images or HTML, and then provide HTTP service at port 80 or HTTPS service at port 443 as required.
However, different runtime frameworks have different features, we recommend that you choose a deployment strategy based on the backend you used.
- Django: WSGI application is generated by default and can be deployed using uWSGI/Gunicorn. If it is an ASGI application generated by asynchronous service, it can also be deployed using Daphne ASGI server.
- Flask: Generate a WSGI application that can be deployed using uWSGI/Gunicorn
- Sanic: It is a multi-process service application and can directly use the Nginx proxy.
- Starlette/FastAPI: Gunicorn deployment with Uvicorn worker can be used
- Tornado: It is an asynchronous service application and can directly use the Nginx proxy.
Tip
Some frameworks like sanic and tornado can run a high performance service by themselves, so you won't need to use WSGI/ASGI server in that case, which can directly proxy by web servers like Nginx
uWSGI
Before using uWSGI, you need to install
pip install uwsgi
You can then use the ini file to write a uwsgi configuration file, such as
[uwsgi]
module = server:app
chdir = /path/to/your/project
daemonize = /path/to/your/log
workers = 5
socket=127.0.0.1:8000
The important parameters include
chdir: Specify the working directory of the service, usually the root directory of the project.module: Specifies the WSGI application of your service, relative to the running directory of the service. assuming that your WSGI application is located at theappproperty ofserver.py, you can useserver:app.daemonize: Set the log file path.workers: Set the number of processes the service runs, which can generally be set to the number of CPUs of the server X 2 + 1socket: The socket address listened by the uwsgi service, which is used to communicate with the proxy server such as Nginx in front.
The command to run the uwsgi server is as follows
uwsgi --ini /path/to/your/uwsgi.ini
Gunicorn
Gunicorn needs to be installed before use
pip install gunicorn
After that, you can write Gunicorn’s configuration files directly using Python files, such as
wsgi_app = 'server:app'
bind = '127.0.0.1:8000'
workers = 5
accesslog = '/path/to/your/log/access.log'
errorlog = '/path/to/your/log/error.log'
The main parameters are
wsgi_app: a reference to the WSGI application that specifies your service, assuming that your WSGI application is located at theappproperty ofserver.py, you can useserver:app.bind: The address of the service listener, which is used to communicate with the proxy server such as Nginx in the front.workers: Set the number of processes the service runs, which can generally be set to the number of CPUs of the server X 2 + 1accesslog: Set the access log path of the serviceerrorlog: Set the running error log path for the service
In addition, you can specify the implementation of the worker process by using the worder_class attribute, which can optimize the running efficiency according to the type of interface, such as
'uvicorn.workers.UvicornWorker': Suitable for asynchronous APIs, such as Starlette/FastAPI,uvicornneed to be installed first'gevent': Suitable for synchronous interfaces, such as Django/Flask, which usegeventcoroutines (green threads) in the library to improve the concurrency performance of the API,geventneed to be installed first
The command to run the gunicorn server is
gunicorn -c /path/to/gunicorn.py
Nginx
For the API service using uWSGI, assuming it is listen to port 8000, the configuration of Nginx is roughly like
server{
    listen 80;
    server_name example.com;
    charset utf-8;
    include /etc/nginx/proxy_params;

    location /api/{
        include /etc/nginx/uwsgi_params;
        uwsgi_pass 127.0.0.1:8000;
    }
}
For Gunicorn or other services running directly, assuming that it is running on port 8000, the configuration of Nginx is roughly like
server{
    listen 80;
    server_name example.com;
    charset utf-8;
    include /etc/nginx/proxy_params;

    location /api/{
        proxy_pass http://127.0.0.1:8000;
        proxy_set_header Host $host;
        proxy_set_header X-Forwarded-For $proxy_add_x_forwarded_for;
        proxy_set_header REMOTE_ADDR $remote_addr;
    }
}
Tip
In order to provide the proper IP of the request (not IP of the Nginx proxy), we need to use proxy_set_header to pass in the corresponding headers
You should place the configured nginx file in /etc/nginx/sites-enabled/ to enable the corresponding configuration, you can use the following command to detect whether there is a problem with the configuration.
nginx -t
If there are no problems, you can restart the nginx service with the following command to make the updated configuration take effect
nginx -s reload
API Management
UtilMeta will soon support full-cycle API observation & management capabilities, including
- API documentation and debugging
- Log query
- API and servers monitoring
- Alert notification, incident management
- Task scheduling
At present, the Beta version of waitlist has been opened on the platform and can be joined at UtilMeta Official Site