User Login & RESTful API
In this case, we will use UtilMeta to build an API to provide user registration, login, query and update information (RESTful API), which are required by most applications. We will also learn how to use UtilMeta to handle database queries and authentication.
Tech Stack
- Using Django as an HTTP and ORM backend
- Use SQLite as the database
- Use Session to handle the user’s login status
1. Create project
We use the meta setup command to create a new project.
meta setup demo-user
django when prompted to select backend
After the project is created, we need to configure the database connection of the service, open server.py, and insert the following code
service = UtilMeta(...)

# new +++++
from utilmeta.core.server.backends.django import DjangoSettings
from utilmeta.core.orm import DatabaseConnections, Database

service.use(DjangoSettings(
    secret_key='YOUR_SECRET_KEY',
))

service.use(DatabaseConnections({
    'default': Database(
        name='db',
        engine='sqlite3',
    )
}))
In the inserted code, we declare the configuration information of Django and the configuration of the database connection. Because Django uses the app (application) to manage the data model, we use the following command to create an app named user
meta add user
You can see that a new folder named user has been created in our project folder, which includes
/user
    /migrations
    api.py
    models.py
    schema.py
The migrations folder is where Django handles the database migrations of the models
Once the app is created, we insert a line into the DjangoSettings of server.py to specify the app.
service.use(DjangoSettings(
    secret_key='YOUR_SECRET_KEY',
    apps=['user']
))
So far, we have completed the configuration and initialization of the project.
2. Write user model
The user APIs depends on the "user", so before developing the API, we should write the user’s data model. We open user/models.py and write
from django.db import models
from utilmeta.core.orm.backends.django.models import AbstractSession, PasswordField

class User(models.Model):
    username = models.CharField(max_length=20, unique=True)
    password = PasswordField(max_length=100)
    signup_time = models.DateTimeField(auto_now_add=True)

class Session(AbstractSession):
    user = models.ForeignKey(
        User, related_name='sessions',
        null=True, default=None,
        on_delete=models.CASCADE
    )
It can be seen that in addition to the User model, we have also written a Session model for users to record user sessions and login status. We will implement user login and authentication through this model.
PasswordField
the password field of User model is using PasswordField to auto-encrypt the input password (with pbkdf2)
Connect database
After we write the data model, we can use the migration command provided by Django to easily create the corresponding data table. Since we use SQLite, we do not need to install the database software in advance. We only need to run the following two commands to complete the creation of the database.
meta makemigrations
meta migrate
When you see the following output, you have finished creating the database
Running migrations:
  Applying contenttypes.0001_initial... OK
  Applying user.0001_initial... OK
The database migration command created a SQLite database named db in the project folder according to the database configuration in server.py , where the table of User and Session models have been created
3. Session and Authentication
After writing the user models, we can start to develop the authentication logic. We create a new file named auth.py in the user folder and write the configuration of session and user authentication.
from utilmeta.core import auth
from utilmeta.core.auth.session.db import DBSessionSchema, DBSession
from .models import Session, User

USER_ID = '_user_id'

class SessionSchema(DBSessionSchema):
    def get_session_data(self):
        data = super().get_session_data()
        data.update(user_id=self.get(USER_ID))
        return data

session_config = DBSession(
    session_model=Session,
    engine=SessionSchema,
    cookie=DBSession.Cookie(
        name='sessionid',
        age=7 * 24 * 3600,
        http_only=True
    )
)

user_config = auth.User(
    user_model=User,
    authentication=session_config,
    key=USER_ID,
    login_fields=User.username,
    password_field=User.password,
)
In this code, SessionSchema is the core engine that processes and stores Session data, session_config declares the Session configuration with Session model and engine we just wrote, and configures the corresponding Cookie policy
Tip
We use session store based on database to simply our tutorial, in practice, we often use cache+db as the store, you can find more in Session Authentication
We also declare the user authentication configuration user_config with the following params
user_model: Specify the user model for authentication, which is the User model I wrote in the previous section.authentication: Specify the authentication method. We passsession_configin to declare that user authentication is performed using Session.key: Specify the key of the current user ID in the session datalogin_fields: Fields that can be used for login, such as username, email, etc., which need to be unique.password_field: The user’s password field. Declaring these allows UtilMeta to automatically handle the login verification logic for you.
4. Write user API
Signup API
First, we will write the user signup API. It should receive the user name and password fields, complete the signup after verifying that the user name is not occupied, and return the newly registered user data.
We open the user/api.py and write
from datetime import datetime
from utilmeta.core import api, orm, request
from utilmeta.utils import exceptions
from .models import User
from . import auth

class SignupSchema(orm.Schema[User]):
    username: str
    password: str

class UserSchema(orm.Schema[User]):
    id: int
    username: str
    signup_time: datetime

@auth.session_config.plugin
class UserAPI(api.API):
    @api.post
    def signup(self, data: SignupSchema = request.Body) -> UserSchema:
        if User.objects.filter(username=data.username).exists():
            raise exceptions.BadRequest('Username exists')
        data.save()
        auth.user_config.login_user(
            request=self.request,
            user=data.get_instance()
        )
        return UserSchema.init(data.pk)
- Detect whether the in
usernamethe request has been registered - Call
data.save()method to save the signup data - Login the registered user to the current request using
login_user - Returns after initializing the new user’s data to a UserSchema instance using
UserSchema.init(data.pk)
Declarative ORM
UtilMeta has developed an efficient declarative ORM mechanism, also known as Scheme Query. We use orm.Schema[User] to define a Schema class with the User model injected, so that we can use the methods of the schema class to create, update, and serialize data. You can find more in Data Query and ORM Document
We can also find that a decorator named @auth.session_config.plugin is plugin to the UserAPI class. This is where the Session configuration is applied to the API. This plugin can save the Session data after each request and patch the response with corresponding Set-Cookie header
Login & Logout API
Next, we'll write the user’s login and logout APIs
from datetime import datetime
from utilmeta.core import api, orm, request
from utilmeta.utils import exceptions
from .models import User
from . import auth
import utype

class LoginSchema(utype.Schema):
    username: str
    password: str

@auth.session_config.plugin
class UserAPI(api.API):
    @api.post
    def signup(self): ...

    # new ++++
    @api.post
    def login(self, data: LoginSchema = request.Body) -> UserSchema:
        user = auth.user_config.login(
            request=self.request,
            ident=data.username,
            password=data.password
        )
        if not user:
            raise exceptions.PermissionDenied('Username of password wrong')
        return UserSchema.init(user)

    @api.post
    def logout(self, session: auth.SessionSchema = auth.session_config):
        session.flush()
In the login API, we call the login() method in our authentication configuration to complete the login simply. Since we have configured the login field and password field, the UtilMeta can help us complete the password verification and login automatically. If the login is successful, the corresponding user instance is returned. So we can throw an error if the login() result is None, and after a successful login, we can call UserSchema.init to return the login user data to the client.
Tip
The use of login() method is not mandatory, you can write your custom login logc if you need
For the logout API, we just need to get the current session and use session.flush() to empty the session data.
Tip
After session configured, you can get the session of the request like the example in the logout function, you will get a SessionSchema instance, and can use it like a dict or other Schema instance
Get & Update user data
When we understand the usage of declarative ORM, it is very simple to write the get & update API of User
from datetime import datetime
from utilmeta.core import api, orm, request
from utilmeta.utils import exceptions
from .models import User
from . import auth
import utype

class UserUpdateSchema(orm.Schema[User]):
    id: int = orm.Field(no_input=True)
    username: str = orm.Field(required=False)
    password: str = orm.Field(required=False)

@auth.session_config.plugin
class UserAPI(api.API):
    @api.post
    def signup(self): ...
    @api.post
    def login(self): ...
    @api.post
    def logout(self): ...

    # new ++++
    def get(self, user: User = auth.user_config) -> UserSchema:
        return UserSchema.init(user)

    def put(self, data: UserUpdateSchema = request.Body,
            user: User = auth.user_config) -> UserSchema:
        data.id = user.pk
        data.save()
        return UserSchema.init(data.pk)
After we declare the user authentication configuration, we can declare user: User = auth.user_config in the API function parameters to get the instance of the current request user in any API that requires user login. If the request is not logged in, UtilMeta will automatically process and return 401 Unauthorized
In the get API, we directly serialize the current request user using UserSchema and return it to the client
In the put API, we assign the current request user's ID to the id field of UserUpdateSchema, and return the updated user data after saving.
Since we can’t allow the requesting user to arbitrarily specify the user ID to be updated, we use the no_input=True option for id field, which is actually a common practice, that is a user can only update his own information.
Core Methods
If your API function using the name of HTTP methods (such as get/put/patch/post/delete), it will bind the method and mount the same route of the API class, these methods are called core methods of the API class
At this point, our API is all developed.
Mount API
In order to provide access to our developed UserAPI, we need to mount it on the root API of the service. Let’s go back to server.py and modify the declaration of the RootAPI.
# new +++
service.setup()
from user.api import UserAPI

class RootAPI(api.API):
    user: UserAPI

service.mount(RootAPI, route='/api')
We mount the developed UserAPI to the RootAPI's user property, which means that the UserAPI path is mounted to /api/user
Tip
You should call service.setup() before import any Django models
5. Run the API
Run the API service using the following command in the project folder
meta run
Or you can use.
python server.py
When you see the following output, the service has started successfully
Starting development server at http://127.0.0.1:8000/
Quit the server with CTRL-BREAK.
Tip
You can alter the host and port params of UtilMeta service in server.py to change the address of the API service
6. Connect the API
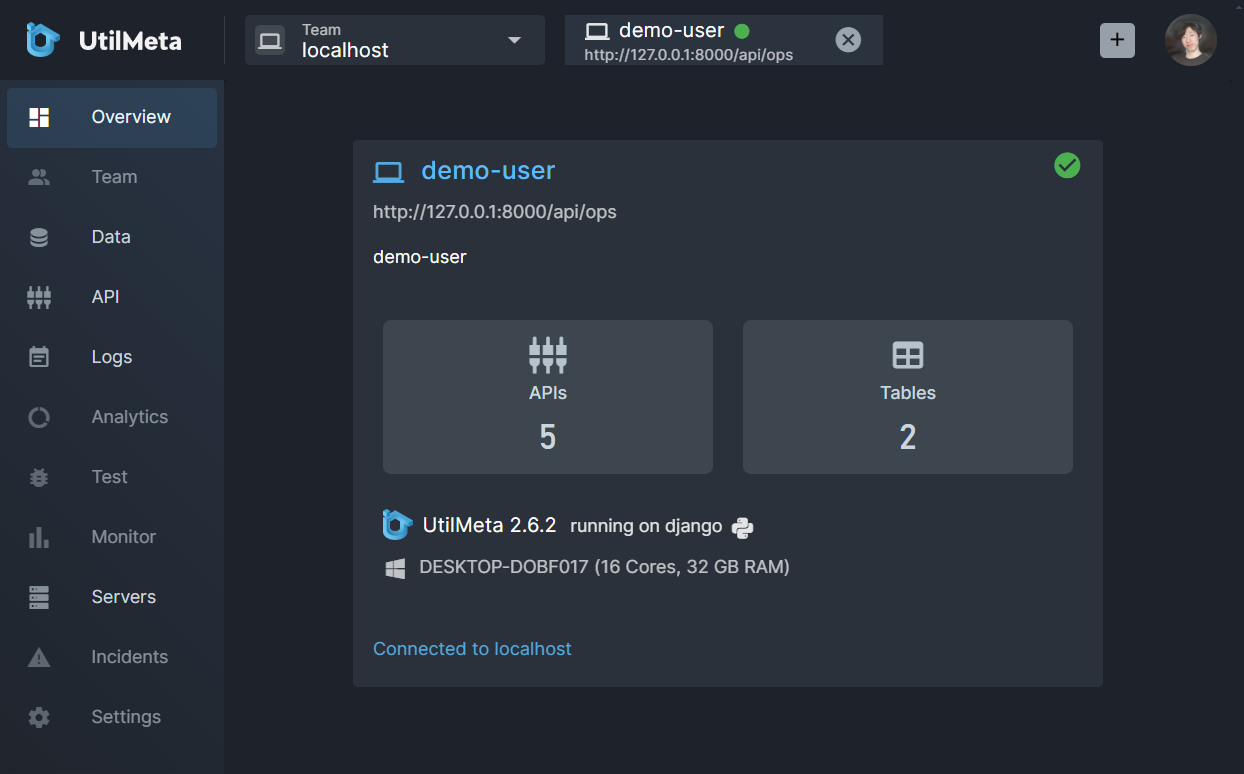
UtilMeta framework has a built-in API service management system, you can easily connect to your API services, view API documentation, logs, monitor and manage data. For our developed user login and registration interface, simply add the following configurations to the service in server.py
from utilmeta.ops import Operations
service.use(Operations(
    route='ops',
    database=Database(
        name='operations_db',
        engine='sqlite3',
    )
))
Our Operations configuration mount OperationsAPI to the route at ops, using a SQLite3 database to store your monitor and logs data.
Restarting the service and we can see the following output
UtilMeta OperationsAPI loaded at http://127.0.0.1:8000/api/ops, connect your APIs at https://ops.utilmeta.com/localhost?local_node=http://127.0.0.1:8000/api/ops
You can click this link directly to open UtilMeta Platform and connect to your local service, or run this command in your project directory
meta connect
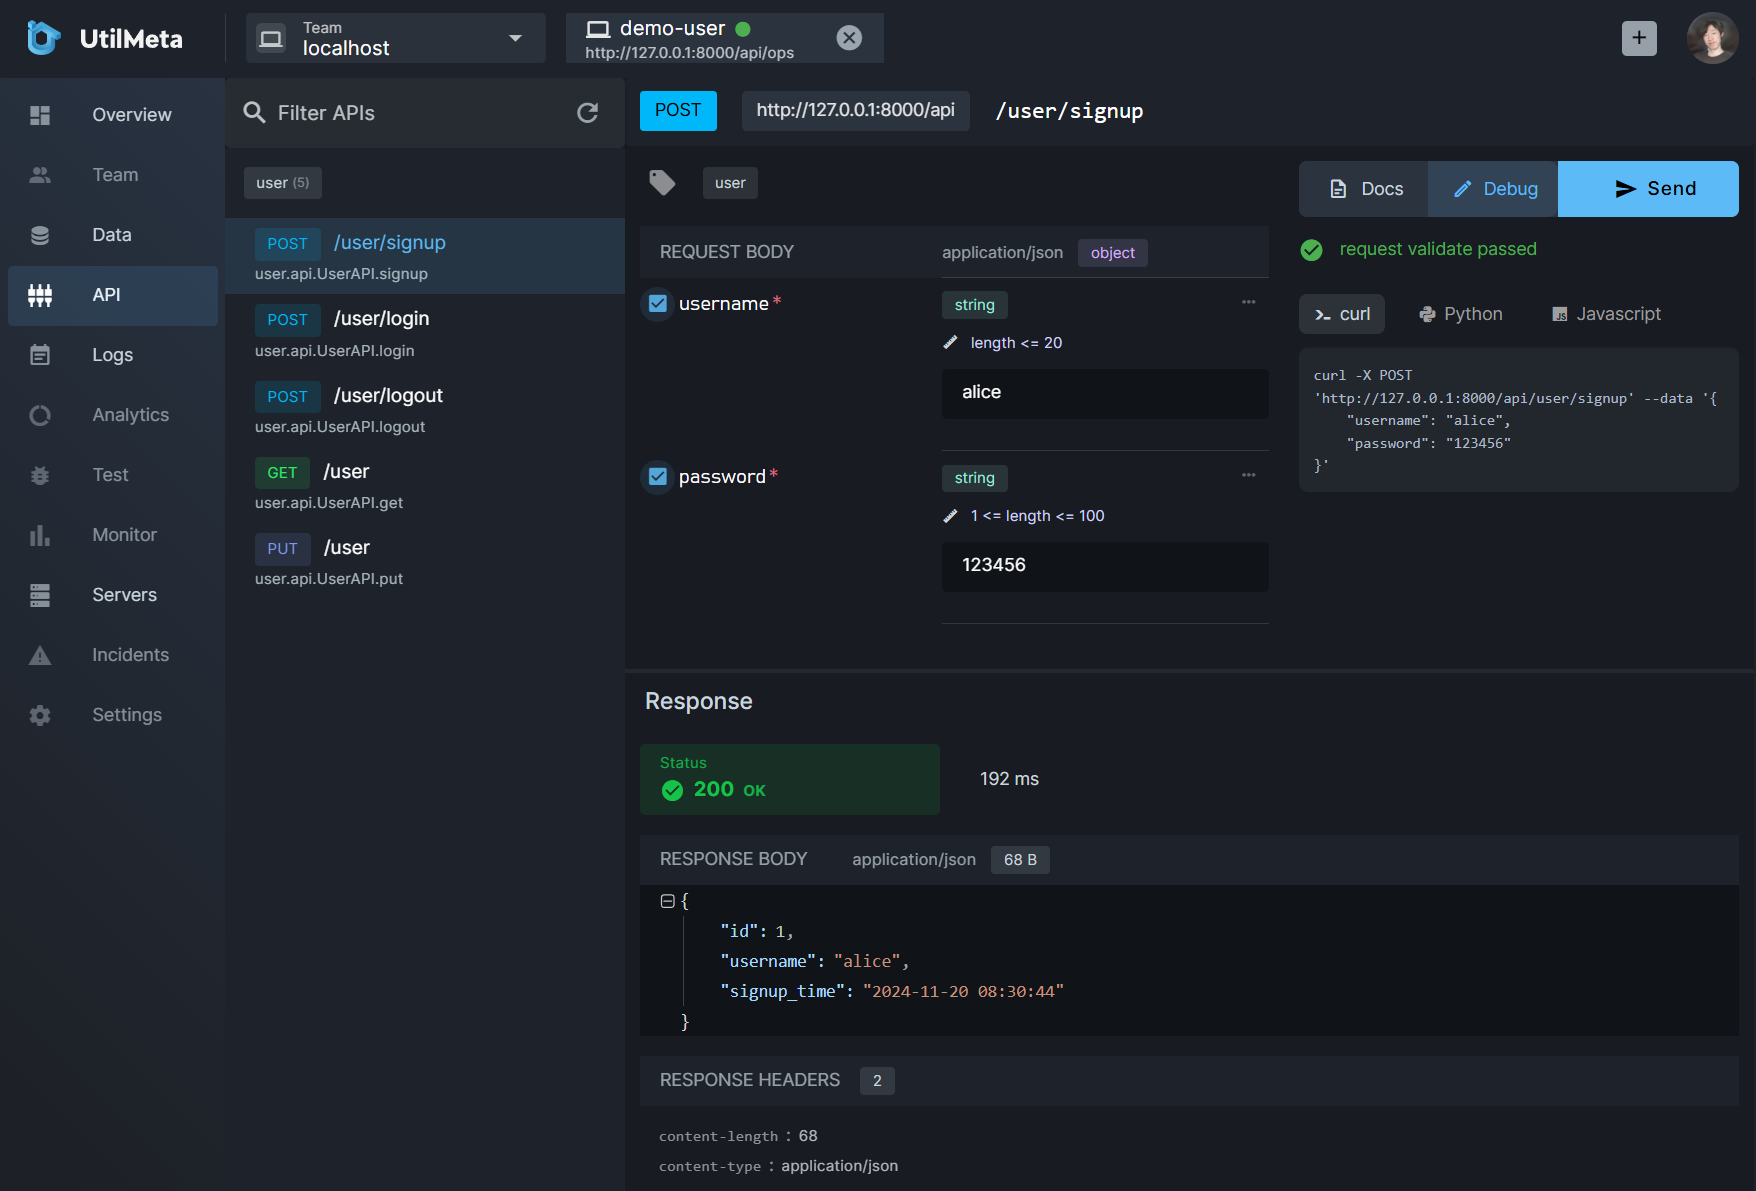
Click API will lead us to the developed User login and signup APIs, we can select signup API, click Debug and create a user
After created successfully, you can click Data to view the newly created user data.
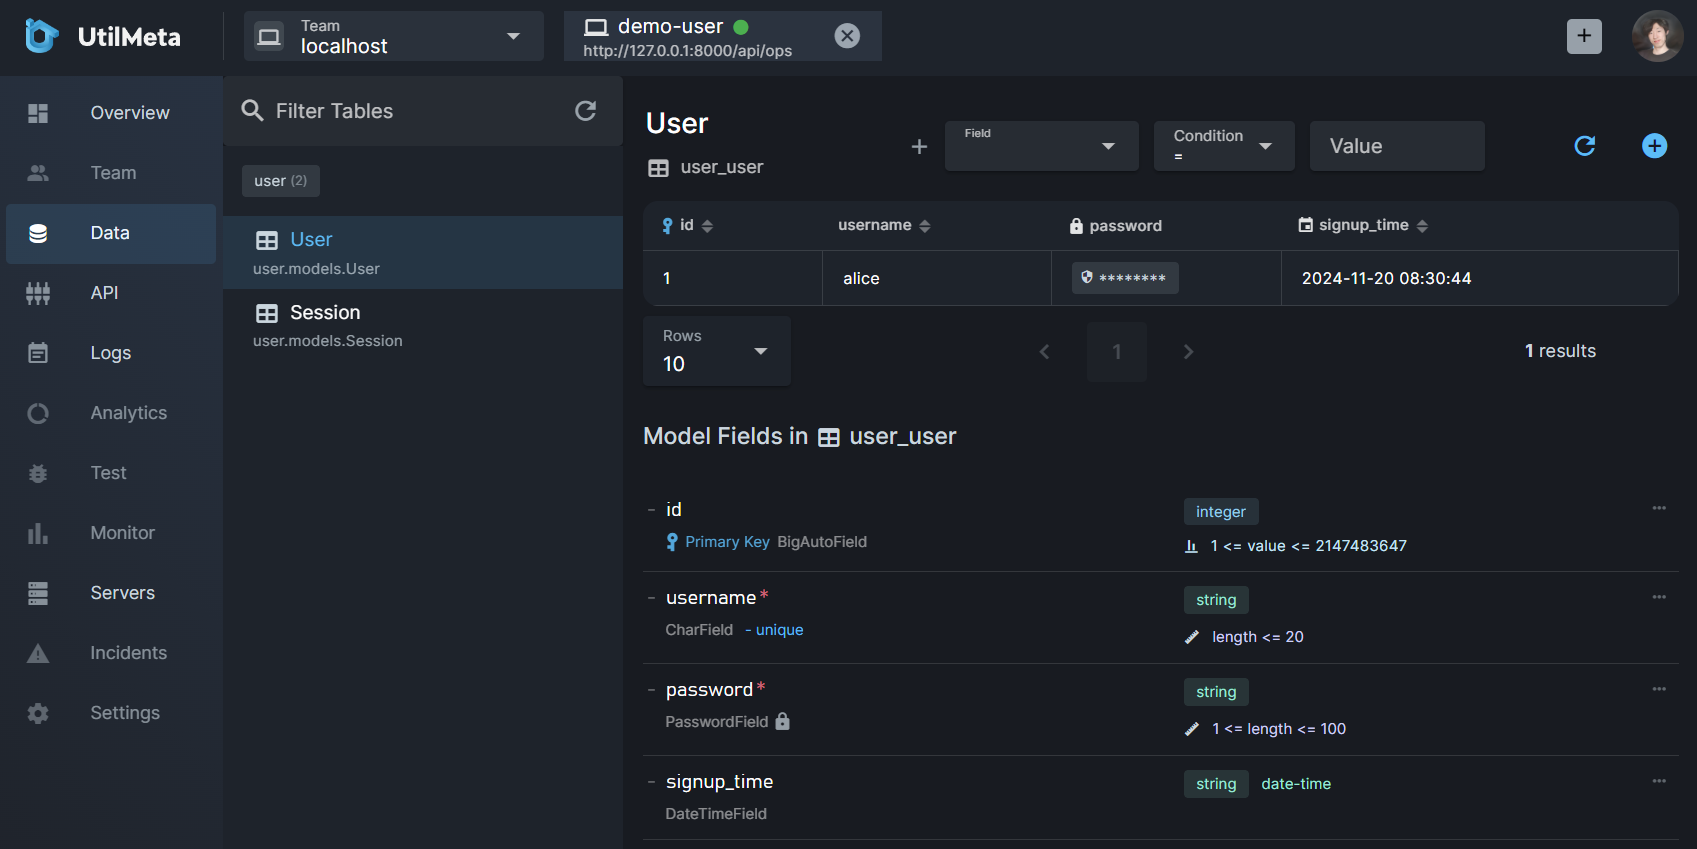 We can select the row in the data table to edit or delete, or click + at the top right corner to create a new instance
Below the data table is the table structure document of the User model
You can also click Logs to view the request logs of the signup API we just requested.
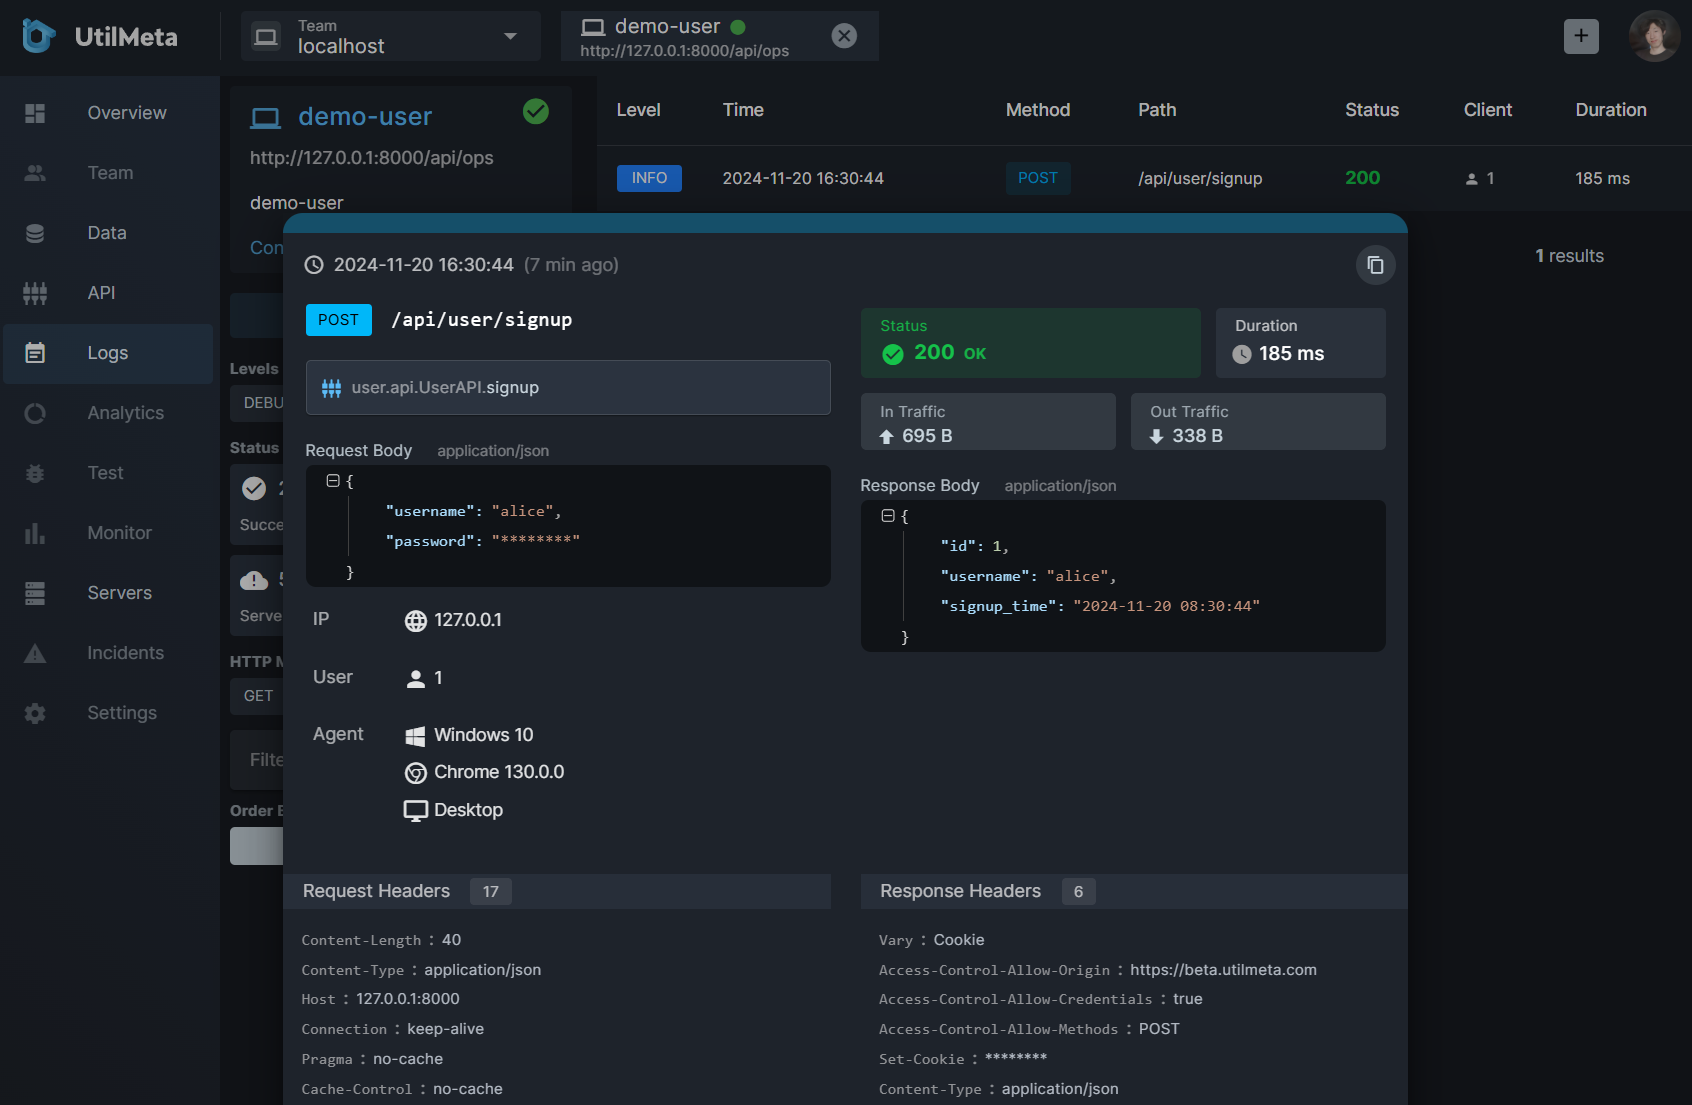 Click the log row will expand the log detail information.
Note
You might notice that the password fields in the data and log sections are automatically hidden, because their names match the default 'secret_name' configured by Operations in UtilMeta service. For more detailed API service connection and management configurations, please refer to the Operations and Management Document
Tip
Due to browser restrictions, local debugging on the web cannot send cookies. If you wish to debug the developed API more comprehensively, you can refer to the following section
7. Debug API
After starting our API service, we can debug the APIs using the client in UtilMeta, let's create a new file named test.py in the project directory and write
from server import service

if __name__ == '__main__':
    with service.get_client(live=True) as client:
        r1 = client.post('user/signup', data={
            'username': 'user1',
            'password': '123123'
        })
        r1.print()
        r2 = client.get('user')
        r2.print()
It contains the debug code for the signup and get APIs, we we started the service and run test.py, we can see the following output like
Response [200 OK] "POST /api/user/signup"
application/json (76)
{'username': 'user1', 'id': 1, 'signup_time': '2024-01-29T12:29:33.684594'}

Response [200 OK] "GET /api/user"
application/json (76)
{'username': 'user1', 'id': 1, 'signup_time': '2024-01-29T12:29:33.684594'}
It means our signup and get APIs worked,
Tip
In the with code block, client will store the Set-Cookie in the response the send in the following requests, so we can see the session works just like the browser
The get_client method of UtilMeta's service instance returns a Client, you can call the methods like get, post of the Client to start a HTTP request, and getting a utilmeta.core.response.Response response, which is identical to the API's response, the commonly used properties are
status: Status codedata: Loaded data, if the response is JSON, you will get adictorlistdataheaders: Response headersrequest: The request object of the response, contains the method, url and other request info
Tip
If the live param is False in the get_client method, it will calls the API functions internally without having to start the service
So you can use this client to write unit tests, like
from server import service

def test_signup():
    with service.get_client(live=True) as client:
        r1 = client.post('user/signup', data={
            'username': 'user1',
            'password': '123123'
        })
        assert r1.status == 200
        assert isinstance(r1.data, dict)
        assert r1.data.get('username') == 'user1'
We can also test the login, logout and update APIs, the complete examples is as follows
from server import service

if __name__ == '__main__':
    with service.get_client(live=True) as client:
        r1 = client.post('user/signup', data={
            'username': 'user1',
            'password': '123123'
        })
        r1.print()
        # Response [200 OK] "POST /api/user/signup"
        # application/json (75)
        # {'username': 'user1', 'id': 1, 'signup_time': '2024-01-29T13:29:03.336134'}
        r2 = client.get('user')
        r2.print()
        # Response [200 OK] "GET /api/user"
        # application/json (75)
        # {'username': 'user1', 'id': 1, 'signup_time': '2024-01-29T13:29:03.336134'}
        r3 = client.post('user/logout')
        r3.print()
        # Response [200 OK] "POST /api/user/logout"
        # text/html (0)
        r4 = client.get('user')
        r4.print()
        # Response [401 Unauthorized] "GET /api/user"
        # text/html (0)
        r5 = client.post('user/login', data={
            'username': 'user1',
            'password': '123123'
        })
        # Response [200 OK] "POST /api/user/login"
        # application/json (75)
        # {'username': 'user1', 'id': 1, 'signup_time': '2024-01-29T13:29:03.336134'}
        r5.print()
        r6 = client.get('user')
        r6.print()
        # Response [200 OK] "GET /api/user"
        # application/json (75)
        # {'username': 'user1', 'id': 1, 'signup_time': '2024-01-29T13:29:03.336134'}
        r7 = client.put('user', data={
            'username': 'user-updated',
            'password': '123456'
        })
        r7.print()
        # Response [200 OK] "PUT /api/user"
        # application/json (82)
        # {'username': 'user-updated', 'id': 1, 'signup_time': '2024-01-29T13:44:30.095711'}
Source Code
the source code of this tutorial can be found at github